Tuesday 25 June 2013

Foundation: Choosing The Right Foundation & How To Match Foundation


The most common questions I get asked are, 'which foundation will be right for me?' and 'how do I match myself for foundation?' Due to a lot of people asking me this I thought I'd do an in-depth post about choosing the right foundation and also matching foundation.

Choosing The Right Foundation

Things To Consider

Before choosing a foundation, you need to consider 4 things:
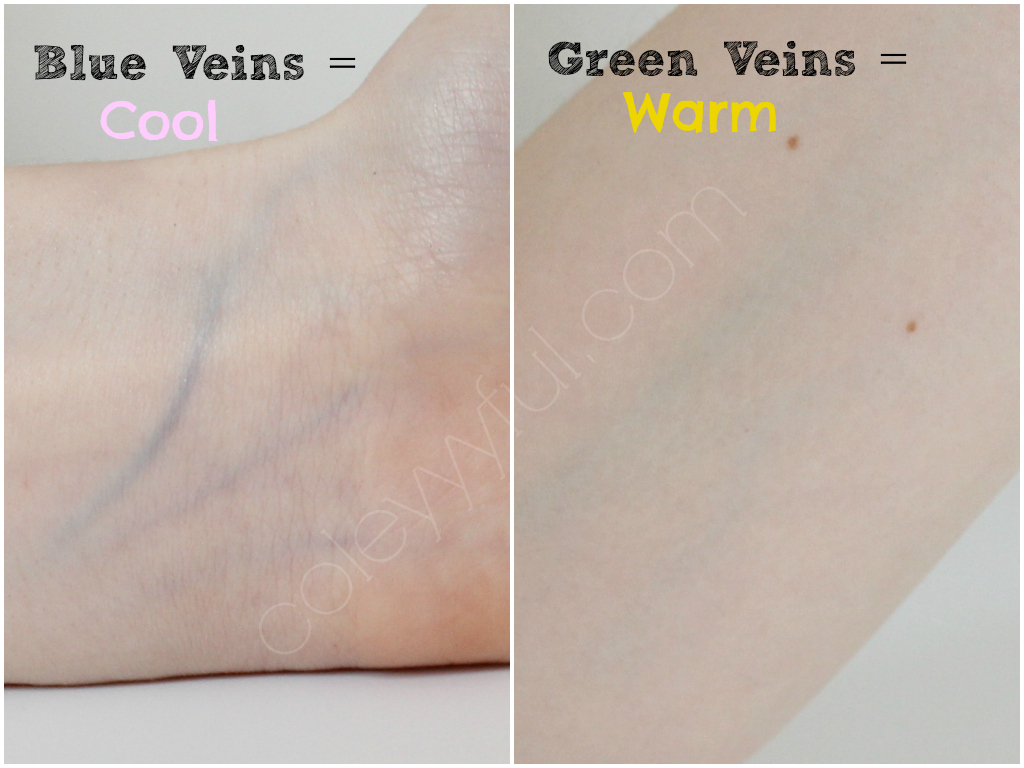
  • Undertone - Do you have a cool, warm or neutral undertone? If you are unsure about what undertone you have, check out my post about skin tones and undertones. If you have a cool undertone you need to choose a foundation that is pink based or neutral based. If you have a warm undertone you need to choose a foundation that is yellow based. If you have a neutral undertone you need to choose a foundation that is neutral based. If you have a neutral-cool undertone you need to choose either a neutral or pink based foundation but if you have a neutral-warm undertone you need to choose either a neutral or yellow based foundation. 
  • Skin Type - Do you have normal, oily or dry skin? If you have normal skin you can wear both water based and oil based foundations, If you have oily skin you need to choose water based foundations and If you have dry skin you need to choose oil based foundations. 
  • Coverage - Do you prefer a sheer, light, medium or full coverage?
  • Finish - Do you prefer a matte, dewy or demi-matte/satin (mix of matte and dewy) finish? If you're unsure about which finish you will prefer then the likelihood is that if you have oily skin you will probably prefer a matte finish and if you have dry skin you will probably prefer a dewy finish.
Skin Tone
After choosing the correct foundation, you need to determine the type of skin tone you have, e.g. a very light, light, light-medium, medium, medium-dark, dark or very dark skin tone.


How To Match Foundation

Where To Match Foundation

A lot of people think that the best place to match foundation is either on the neck, on the jawline, on the inner wrist, the back of the hand or on the cheek but those places are all wrong. And if you're ever matched on those places by sales assistants please do not buy a foundation from them as this is a clear indication that they have little knowledge in matching foundation.

So why shouldn't we match foundation on those places...
Inner Wrist / Back Of Hand - You simply cannot match foundation on your wrist or hand because the skin on your wrist and hand is nothing like the skin on your face. Your wrist and hand are also the places that get little exposure to daylight or sunlight meaning the skin on your wrist and hand is going to be a lot lighter than the skin on your face. This is why you should never match foundation on your wrist or hand. 
Neck - The reason we shouldn't match foundation on your neck is because your face casts a shadow down onto your neck.  When you're directly exposed to the daylight or sunlight, it hits your face, not your neck meaning your face is considerably darker than your neck. Your neck is actually one of the palest parts of the skin as it receives the least amount of sun therefore is contain lower levels of pigment than many other parts of the skin. If you match foundation to your neck, the likelihood is that you'll end up buying  a foundation that's too pale for you. 
Jawline - Because of bone structure, your jawline can cause unintentional highlights or shadows that can be lighter or darker than the rest of your face. So you could potentially end up matching your foundation to either a light or dark part of your jawline meaning it will not match the whole of your face. 
Cheek - Due to several factors, including temperature (warm & cold) and also facial imperfections, your face may not have the same undertone as the rest of your body, your face could have a pink undertone (due to several factors) and your body could have a yellow undertone, and vice versa. If you buy a pink based foundation as it matches your facial undertone but doesn't match your bodies undertone, your foundation isn't going to look right. If your body has a yellow undertone, you need to buy a yellow based foundation as this will match both your face and your body. If your body has a pink undertone, you need to buy a pink based foundation as this will match both your face and your body. If you have a neutral undertone, you can wear both yellow and pink based foundations. 

Now we know where we shouldn't be matching foundation, I'm now going to tell you where you should be matching foundation. You should actually match foundation on your chest, and if you're unable to match on your chest, the second best place is on the outer part of your arm. 

Why should we match foundation on those places...

Chest - The best place to match foundation is on your chest because you want your face to match the rest of your body. By matching foundation to your chest, you are matching it to the part of your body that receives the same amount of daylight and sunlight as your face.
Outer Arm - If you're unable to match foundation on your chest, due to wearing tricky clothing etc, the next best place to match foundation is on your arm. Again, the skin on your outer arm receives a lot of daylight and sunlight therefore the tones of your outer arm are going to be very similar to the tones of your face.

How To Match Foundation

So now we've established where the best place to match foundation is, we're now going to look at the best way to match foundation.

When matching foundation there are four things to consider:
  • 3 Shades - It's important to select 3 shades. So if you fit into the light skin tone category, select the 3 lightest shades, if you fit into the medium skin tone category, select the middle 3 shades and if you fit into the dark skin tone category, select the darkest 3 shades. The reason why we choose 3 is because one will be too light, one will be just right (in the words of goldilocks) and one will be too dark. Once you've chosen 3 shades, you need to place them on your chest. One thing you need to remember is that you should place each shade far apart from one another, do not place them next to each other, so place the lightest shade on the right side of your chest, the middle shade in the centre of your chest and the darkest shade on the left side of your chest.
*Original image taken from Cafe Makeup
  • Blending - When blending each shade into your skin it's important to use a clean finger for each shade. If you use the same finger you may run the risk of mixing shades and this is something you don't want to do as it won't give an accurate representation of each shade. 
  • Temperature - You need to make sure that the temperature of your body is at normal body temperature, you simply cannot match foundation if you have either a very warm or very cold body temperature as this could cause pink or red tones to appear within the skin. 
  • Natural Daylight - It's important to see what the shades look like in natural daylight. If a store hasn't got access to daylight, you need to physically go and stand outside in it. If you test the shades in a store that doesn't have natural daylight, you may end up choosing the wrong shade as store lights can be so bright that they heavily reduce the colour of products. They also use different coloured light bulbs which can effect the colour of products, for example, a yellow light bulb will make something appear more yellow. You could end up choosing a shade that's far too pale or too dark, or a shade that's far too yellow toned or pink toned. Looking at shades in natural daylight is important when matching foundation. 

Once you have matched the foundation to your chest, pick up a sample of the correct shade so you can trial the foundation at home. My advice is to try before you buy because there's no point spending money on a foundation that may not be right for you, in terms of wear, coverage or finish. If some sales assistants say they haven't got any sample pots left, simply take your own so they have to give you a sample. If you're looking for sample pots, check out eBay, they literally sell 10 sample pots for as little as £2.00!

Oh and another piece of advice, no matter how pushy a sales assistant can be about matching you to a foundation, just politely decline and say you'll be okay matching yourself. I can 100% guarantee that some of the sales assistants you encounter will NOT be trained in makeup artistry so the likelihood is that they'll match you in the wrong place and give you the wrong shade. When it comes to some brands it's all about selling, they couldn't care less about what their employee puts on a customers face.

In my part 2 foundation post I'm going to be talking about types of foundations that are available, oil based and water based foundations, methods of applying foundation and the different tools you can use when applying foundation. I'm also going to talk about foundations for normal, oily and dry skin.

Video Version
If you're unable to see the video below, please click here.

I hope this post has help you to understand why you need to think about when choosing and also matching a foundation

Thanks for reading and I'll talk to you in my next post!

Much love,
Cole
x

Friday 21 June 2013

1950's Inspired Prom Makeup Tutorial


As it's prom season here in the UK, I thought I'd do a prom makeup tutorial. Now the typical prom makeup tutorials on Youtube are variations of a smokey eye so I'd thought I'd do something a little different. I love the 1950's and judging from the photograph I posted on Instagram last week, the majority of you do too. I thought I'd combine both the 1950's and prom makeup to create a 1950's inspired prom makeup tutorial. I'm going to be doing a traditional 1950's makeup tutorial soon so keep a look out for that.
If you want to create this look, keep on reading!

Face
1.) Apply a primer to your skin. If you have oily skin you need to use a matte primer and if you have dry skin you need to use a satin primer or moisturiser.
2.) Once the primer has dried, apply foundation using a buffing brush. Using a buffing brush will help to buff the foundation into the skin and this will give a flawless finish. If you have oily skin you need to use a water-based foundation and if you have dry skin you need to use an oil-based foundation. After selecting the correct foundation for your skin type, you need to think about the coverage and finish you would like (e.g. light, medium or full coverage & matte, dewy or demi-matte finish).
3.) After you have finished the eye makeup, apply concealer underneath your eyes and also on any imperfections. Remember to use a salmon/pink toned concealer underneath your eyes and a concealer that matches your foundation on any imperfections. You can also use a lighter concealer to highlight with, you could highlight your chin, cupid's bow, cheekbones, centre of the nose, above your eyebrows and the centre of your forehead.
4.) Using an angled face brush and a matte brown bronzer, sculpting powder/cream or darker concealer, contour your face. You could contour your cheekbones, nose, forehead, temples, under your chin, basically wherever you feel like you need to contour.
5.) Apply a pale blush to the apples of the cheeks. You don't want to use a bright blush as the eyes and lips are dramatic therefore you need to keep face makeup quite natural.
6.) If you so wish, you could apply a powder or cream highlight to your cheekbones.

Eyes
1.) Apply a base to your eyes, e.g. an eyeshadow base, concealer or paint pot. Apply the base all over your eyelid using either your finger or a flat eyeshadow brush and blend using a blending brush. This will blend out any harsh lines.
2.) Brush your eyebrows through with a spoolie brush. Then using an eyebrow powder or eyeshadow and an angled eyebrow brush, apply a paler shade to the inner part of the eyebrow and a darker shade to the outer part. Set with an eyebrow gel or simply spray your spoolie brush with hairspray and brush though your eyebrows.
3.) Using a flat eyeshadow brush, apply a light cream shimmer eyeshadow all over the eyelid up to the crease. Blend the edges using a blending brush.
4.) Apply a soft brown eyeshadow to the outer corner of the eye and blend into the crease, this can be done using a blending brush.
5.) Apply a darker brown eyeshadow to the very outer corner of the eye and blend using a blending brush. If you want to create a smokey look, keep building up the colour. If you want a softer look, repeat the step twice, no more than that.
6.) Using a small brush, apply a light cream shimmer pigment to the brow bone and the inner corner of the eye.
7.) Using an eyeliner brush and a black gel eyeliner, create a wing. You can create a subtle or strong wing, it's entirely up to you.
8.) Using a pencil brush, apply a small amount of the dark brown eyeshadow to the bottom lash line.
9.) Then line the lower lash line with a black kohl eyeliner and smudge with an eyeshadow brush.
10.) Apply black kohl liner to both the top and bottom waterline.
11.) Apply mascara and/or eyelashes.

Lips
1.) Line the lips with a red lip pencil. Either follow your natural lip shape or create a fuller or smaller lip.
2.) Using a lip brush, apply red lipstick over the top of the lip liner.

Once your makeup is done, set with a setting spray as this will prolong your makeup.


Obviously you don't have to wear red lips, you could go for a nude, pink or coral lip instead but due to this look being inspired by the 1950's I thought I'd go for a red lip. You could also opt for a subtle wing as opposed to a dramatic wing, it's entirely up to you. You could also re-create this look using different colours on the eyes, for example, silver and black. 

Products Used:
Face
  • Illamasqua Skin Base Foundation
  • Collection 2000 Lasting Perfection Concealer
  • MAC Sculpting Powder in 'Sculpt' 
  • Inglot Blush in '10' 
  • MAC Prep & Prime Translucent Primer
Eyes
  • MAC Paint Pot in 'Painterly'
  • Inglot Rainbow Eyeshadow
  • MAC Eyeshadow in 'Vex'
  • Urban Decay Naked Basics Palette
  • MAC Pigment in 'Vanilla'
  • MAC Fluidline in 'Blacktrack'
  • MAC Kohl in 'Smoulder' 
  • Red Cherry Eyelashes
Lips
  • MAC Lip Liner in 'Cherry'
  • MAC Lipstick in 'Russian Red'
Video Tutorial

I hope you all liked this tutorial and if you decide to re-create it, please tweet me @Coleyyyful as I'd love to see! If you have any questions, please feel free to comment below!

Much love,
Cole
x

Wednesday 19 June 2013

Understanding Skin Tones & Undertones: Cool, Warm & Neutral


Since I've had several people asking me to do a video about skin tones and undertones, I thought I'd do an in-depth post and video about it. It's a very complex topic and I really could go into massive depth but I'm pretty sure it would boggle your mind, so because of this I'm going to make it simple and easy to understand. I'm going to talk about skin tone, undertone, methods of identifying undertone and complimenting colours. 
Skin Tones & Undertones

It's important to know your undertone as you may end up buying the wrong foundation for your skin. If you wear a foundation that isn't appropriate for your undertone, your foundation may end up looking dull, muddy or ashy. The foundation may match your skin tone but it may not match your undertone so this is why it's important to know your undertone. 

Not only can undertone determine which foundation you need but it can also determine what eyeshadow, blush and lipstick you should wear. It can also determine what clothing you should wear.

The first thing you should know is that there is a difference between skin tone and undertone. Your skin tone is the colour of your skin and your undertone is the tone/s within your skin. A lot of people think that cool, warm and neutral are skin tones, but they are in fact undertones.
Another thing you should know is that your skin tone can change, but your undertone never changes. An example of this is tanning, you may tan during the summer meaning your skin tone will change but your undertone will not change. 

Different Types of Skin Tone:
  • Very Light
  • Light
  • Light - Medium
  • Medium
  • Medium - Dark
  • Dark
  • Very Dark

Different Types of Undertone:
  • Cool - Red, Pink or Bluish Tones.
  • Warm - Yellow or Golden Tones.
  • Neutral - Both Red & Yellow Tones (or neither). 
  • Neutral Cool - Neutral undertone but sways more to the cool side.
  • Neutral Warm - Neutral undertone but sways more to the warm side.

The 7 methods of identifying a cool, warm or neutral undertone

1. Genetics

One way of determining your undertone is by your genetics, this includes your hair colour and your eye colour. 
If you have black, brown or blonde hair and have blue, green or grey eyes, you have a cool undertone. 
If you have black, brown, auburn, blonde, strawberry blonde or red hair with black, brown or hazel eyes, you have a warm undertone.

2. Vein Test

Another way of identifying your undertone is by looking at your veins, it's a quick and easy method that takes little time to do. The easiest veins to look at are the veins in your wrist, hand or arm (especially the veins in the crook of your arm). 
If your veins are blue, you have a cool undertone.
If your veins are green, you have a warm undertone. 
If your veins are a bluish green (like turquoise/aqua), you have a neutral undertone. 

3. White Fabric Test

The white fabric test will determine if you gave a cool, warm or neutral undertone. All you need is some form of white fabric, this may be a white towel, a white t-shirt, a white cloth or white sheet (basically anything that's white), a bobble (hair tie), cleanser and your dandy little self.

When carrying out the white fabric test there are 4 steps you need to do: 
  1. Tie your hair back into a ponytail. 
  2. Clean your face so there's absolutely nothing on your skin. 
  3. Place the white fabric around your neck. 
  4. Stand in natural day light and hold a mirror to your face. 
If your face appears to have red/pink tones, you have a cool undertone. If your face appears to have yellow/golden tones, you have a warm undertone. If your face appears to have both pink and yellow tones or it doesn't appear to have any tones, you have a neutral undertone. 

4. Clothing Test


Clothing can also determine which undertone you have. If you look better in white than ivory or cream, you have a cool undertone but if you look better in ivory/cream than white, you have a warm undertone. The same applies for black and brown clothing, if you look better in black than brown, you have a cool undertone but if you look better in brown than black, you have a warm undertone. If you look great in white, ivory/cream, black and brown, you have a neutral undertone. You can also test other coloured clothing but white/ivory and black/brown are the easiest to test. 

5. Silver or Gold Test

Another simple method of identifying undertone is the gold/silver method. You may wish to try the jewellery on yourself or you may already know what suits you better but the general idea is that if silver jewellery suits you more than gold jewellery, you have a cool undertone. If gold or copper jewellery suits you more than silver jewellery, you have a warm undertone. If you're a lucky devil and suit both silver and gold jewellery, you have a neutral undertone. 

6. Tan Test

Again another simple method is the tanning method. If you burn easily when exposed to the sun, you have a cool undertone but if you tan easily when exposed to the sun, you have a warm undertone. Obviously there is going to be exceptions, but that's the general idea. 

7. Complimentary Test
If you notice that you're getting more compliments when wearing a certain eyeshadow, blush or lipstick, you should write down what product it is and identify if it's cool toned or warm toned, if the product is cool toned it will have a blue or red undertone, if the product is warm toned it will have a yellow or orange undertone. For example, if you notice you're getting compliments when wearing a blue toned lipstick (e.g. MAC 'Russian Red'), the likelihood is that you have a cool undertone but if you notice you're getting compliments when wearing an orange toned lipstick (e.g. MAC 'Lady Danger'), the likelihood is that you have a warm undertone. The same applies for clothing too, if you want to know colours that compliment your undertone, keep on reading.  

Colours that compliment cool and warm undertones


The colour wheel indicates cool and warm colours. 


The chart indicates the colours that suit a cool undertone and a warm undertone. 

Cool:
Cool colours are based on true reds, greens, blues, blue toned greens, pinks, purples, magentas, icy colours and pastels. 

Warm:
Warm colours are based on warm reds, oranges, yellows, yellow toned greens, browns, golden/bronze colours and peach/apricot colours.
It's also important to know that you can have a cool or warm toned colour, for example, a cool toned pink (blue based) and a warm toned pink (yellow based). Just remember cool is anything with a blue/pink/red tone and warm is anything with a yellow/orange tone. 


It's important to know that there are ALWAYS exceptions when it comes to undertone, so if you're a bit confused as to what you think you may be, try a pink based, yellow based and neutral foundation to see which suits you best.

Video Version

I hope you found this post helpful and I shall be doing a foundation post very soon! If you have any questions, please feel free to ask away!

Many thanks,
Cole
x

Sunday 16 June 2013

Top 10 Bright Lipsticks For Summer

Since we have had such lovely weather recently (obviously being sarcastic), I thought I'd do a post on my top 10 bright lipstick picks for summer (such a weather appropriate post). Now I know we tend to have a dull and dreary summer in the UK and if truth be told it really hacks me off because of two reasons. One, I've got a shite load of clothes in my wardrobe that I can't wear (which I've spent a fortune on), and two, it generally just makes me feel sad. So since I can't wear my bright summery clothing, I opt for bright summery makeup instead, doing this kills two birds with one stone so to speak, as I still look summery even though it's pissing down and I also feel a whole lot happier. There's just something about wearing bright lipstick that makes me feel all jazzy.  
I have chosen 10 bright lipsticks that I think are perfect for summer, or should I say 'sinter' (a mix of summer and winter). Some people may love every lipstick I've chosen but some people may not hence why I have chosen a selection of different shades, from red to orange to pink to purple. So if you like pink lipsticks but hate red lipsticks, I've hopefully included a lipstick you might like. It's also important to mention that the lipsticks are bold and bright so if you're not fond of wearing bright colours on your lips, you're probably not going to enjoy this post. I've also chosen lipsticks that aren't limited edition and are readily available to anyone, how thoughtful am I!
So let's crack on and look at the lipsticks!


 MAC 'Lady Danger' (matte) - £14.00

MAC 'Lady Danger' is possibly my most favourite red lipstick of all time and this is due to the colour and the lipstick itself. It's a beautiful coral toned red lipstick that has a matte finish. In terms of colour, this beauty packs a punch, it's a vibrant fiery red that is perfect for wearing in summer. In terms of the product, it is wonderful as it has excellent pigmentation, immense colour pay off, great staying power and it isn't too drying. The one thing I worried was that it would be too drying and that the lipstick would cling to the dry, flaky patches on my lips as matte lipsticks tend to do that, but I have to say that the lipstick is quite moisturising even though it has a matte finish. It's a great bright red lipstick and I thoroughly enjoy wearing it in summer.  

 Rimmel Apocalips in 'Stellar' - £5.99

I bought this not long ago and I have to admit that its quickly become one of my favourite bright red lipsticks. Again like 'Lady Danger', 'Stellar' is a coral toned red lipstick but in my opinion it's verging more on the coral side than the red side. It's insanely pigmented meaning you only need to use the smallest amount, and like the OCC Lip Tars, if you apply too much of the product, feathering around the edges of the lips will occur.  It's important that you either use a small amount of the lipstick or a lip liner to prevent feathering or bleeding. The Rimmel Apocalips are a lip lacquer which is a hybrid of lipstick and lipgloss. Due to the Apocalips being a lip lacquer it means they are extremely creamy and slightly sticky and they will not dry down. They are ideal for those of you who have dry lips but are not so great if you don't like lip products that are either sticky or don't dry down. 'Stellar' has amazing colour pay off and good staying power. I love 'Stellar' and I'll be wearing this often as it's perfect for summer.

YSL Rouge Volupte in '27 - Rose Paris' - £24.50

There were two things that drew me to this lipstick, one, the colour and two, the packaging. I absolutely adore the colour of this lipstick and I'm so glad I bought it, even if I did cry about it's ridiculously high price tag. It's a typical bright coral lipstick, despite it being called 'Rose Paris' (really don't understand that one), and it is uber creamy meaning it's the dream lipstick if you have dry lips. It's also very pigmented and has great colour pay off meaning you only need to use a small amount. However, there is one issue. I'm not going to bullshit here by saying that it has amazing staying power because it doesn't, if you drink or eat, it's game over.. it will be all around your mouth and on your chin. So to sum up this gold tube of lovely coralness, it's a gorgeous colour, has great pigmentation and the packaging is beautiful but the staying power needs tweaking. If you were planning on selling a kidney in order to buy one of the YSL Rouge Voluptes, I'd have a re-think but if you're in the position where you can easily splurge on a £20 lipstick, then go ahead! 

MAC 'Costa Chic' (frost) - £14.00

Now I'm not going to lie, I'm really not a fan of MAC's frost finish lipsticks as I haven't had any pleasant experiences with them. I have MAC 'Tanarama' (also a frost finish) and every time I wear it, it makes me feel like I should be in Saved By The Bell sporting a high ponytail and uber high waisted jeans. I think MAC 'Costa Chic' is the only exception when it comes to MAC frost finish lipsticks as it's utterly beautiful, I love the colour and yes, I love the finish. 'Costa Chic' is a light coral colour, it also have a slight sheen to it which makes it different from other coral lipsticks on the market. It has great pigmentation and staying power and it also feels silky on the lips. The only thing I will say about it is that you have to build up the colour as one layer can look patchy and uneven. Personally I don't mind building up the colour as I like to spend a while doing my lipstick, every ounce of my makeup has to be perfect. 'Costa Chic' is a lovely summery lipstick and I would recommend it to anyone, especially to those of you who want to wear a coral lipstick but don't want to wear a mega bright 'in your face' coral lipstick. It's also a lipstick that would probably suit everyone, it doesn't matter if you have a light, medium or dark skin tone, this lipstick will suit you. I love it and I especially love wearing it when I've got a tan. 

OCC Lip Tar in 'Divine' - £12.00

I love OCC Lip Tars hence why I own about 500 of them, they come in a whole array of bright colours  which can be worn alone or mixed together. OCC Lip Tars are so super pigmented and have insane colour pay off so it means you only have to use a small amount, and when I say small I literally mean pin head sized amount. The reason why you have to use a small amount is because they spread like wildfire, if you use too much then feathering will occur around your lips. It's also important to apply the lip tar with a lip brush as you physically cannot apply it directly from the tube, if you attempt to apply it from the tube you're going to be in a pickle. They also have incredible staying power, especially when when over the top of a lip liner, meaning you don't have to worry about re-applying. I love OCC Lip Tars and I especially love 'Divine' as it's a fab coral lipstick. Just like 'Costa Chic', 'Divine' would be the perfect coral lipstick for anyone who doesn't feel brave enough to wear an extremely bright coral lipstick.

MAC 'Viva Glam Nicki' (satin) - £14.00

I bought this when it was first released and it's become one of my favourite lipsticks ever since. It's one of my most worn lipsticks as I tend to wear it at least twice a week. If I were to write a 'favourite lipsticks of all time' post, this baby would definitely be in it. 'Viva Glam Nicki' has a satin finish and is described as a bright yellow toned pink lipstick, it's quite bright but can be worn lightly if you're not a huge fan of very bright lipsticks. 'Viva Glam Nicki' also has a satin finish which is great as it's soft and creamy, ideal for anyone who wants a bright coral/pink lipstick but has dry lips. 'Viva Glam Nicki' is pigmented, has good colour pay off and has great staying power (and that's WITHOUT a lip liner). I absolutely love it and I personally think it's a great lipstick for wearing in the summer. I honestly think I'm going to buy a backup because I'd be devastated if they ever discontinued it. 

YSL Rouge Pur Couture in '22' - £25.00

I love wearing this lipstick in summer as it makes me feel girly and summery, a bit like a barbie really. '22' is a blue toned baby pink, it's identical to MAC 'Viva Glam Gaga' except it's a little brighter hence why I included '22' instead. '22' ticks all the boxes in terms of packaging, pigmentation, colour pay off and staying power but the only thing it lacks is opacity as it can be a little patchy. Due to it being patchy you have to build up the colour to make it even. If you wear a lip liner underneath it you don't have to build it up but if you wear it alone, you do. '22' is a perfect colour, especially for wearing in summer. 

MAC 'Candy Yum Yum' (matte) - £14.00

MAC 'Candy Yum Yum' is my all time favourite bright pink lipstick and I think the above photo explains why. 'Candy Yum Yum' has a matte finish and is described as a neon pink and that's exactly what it is, it's probably the brightest pink lipstick I've ever come across (and I've come across a few!). It's not a lipstick for the faint hearted so if you don't like insanely bright lipsticks, you won't like this, it's not as if you could wear it lightly either as it would still be quite bright. 'Candy Yum Yum' has great pigmentation and colour pay off and due to it having a matte finish it also has great staying power, it lasts around 10 hours on the lips. 

Maybelline Color Sensational Vivid in 'Hot Plum' - £7.19

My mamma absolutely loves the Maybelline Colour Sensational Vivids and has told me to try them for months. Since I'd forgotten all about them, she recently bought me one so I could see how amazing they are. She bought me the shade 'Hot Plum' as she knows how much I like purple and pink lipsticks. 'Hot Plum' is a purple toned pink lipstick and it has a satin finish. It's very pigmented, has great colour pay off and it has incredible staying power. I'm not exaggerating when I say this but it's honestly better than any high-end lipstick that I own, I would definitely choose one of the Vivids over a MAC lipstick any day. A MAC bright lipstick usually lasts around 5-6 hours on the lips whereas 'Hot Plum' lasts all day on the lips, and that's without using a lip liner. Another positive thing about 'Hot Plum' is that it's really hydrating meaning it does wonders for dry lips. I love 'Hot Plum' and I'll definitely be wearing it loads in summer. 

OCC Lip Tar in 'Hoochie' - £12.00

I'm not going to go into much detail about OCC Lip Tars as I explained about them earlier on in this post. All I can say about 'Hoochie' is that it's a beautiful bright purple lipstick. This won't be many people's cup of tea as it is rather bright and it is different to the norm as it's not a pink, red or orange toned lipstick but I thought I'd include it as it's a fab colour and it's a lipstick I'd definitely wear in summer. So, if like me, you like wearing unusual shades of lipstick, you're probably going to love this. 

Swatches


As you can see, all these lipsticks are extremely bright and are perfect for summer. I hope this has helped you discover some of the bright lipsticks that are on the market. 

I hope you all liked this post and if you have any questions, please feel free to comment below. 

Much love,
Cole 
x

Saturday 15 June 2013

Colours Of The Rainbow Tag!


I was recently tagged by the lovely Gemma from Gemsmaquillage to do the Colours of the Rainbow Tag. The rainbow tag is a rather popular tag at the moment and many of you will know this as it has been floating around the blogging and Youtube world for a few weeks. The rainbow tag is such a fun tag to do and it's understandable that many people have done it. If you're not familiar with the rainbow tag, then you basically have to apply the colours of the rainbow (red, orange, yellow, green, blue, indigo, violet and also pink and multicoloured) to beauty and/or fashion items. You can either relate the colours to beauty products, fashion items or you can have a mix of the two, I chose to relate the colours to just beauty products as I wanted to keep things simple. 
So without further ado, here are my 9 colourful beauty products!


Red - MAC Lipstick in 'Lady Danger'
'Lady Danger' is possibly my most favourite red lipstick of all time and if it was ever to be discontinued, I'd literally buy 10 backups (and that's no exaggeration). 'Lady Danger' is a bright red, orange toned lipstick and it has a matte finish. If you're looking for a red lipstick that has great staying and packs a punch then this will be perfect for you! I love MAC lipsticks in general but this one really does stand out from the rest, the colour is insane, it's super duper pigmented and it lasts for hours on the lips (and that's without a lip liner!). I had to use this for my red product as it's such an amazing lipstick, if you want to see how beautiful it is, a swatch is provided at the end of this post.

Orange - MAC Lip Pencil in 'Lasting Sensation'
Now I've used this lip liner for my orange product for 2 reasons, one, it's a beautiful lip pencil and two, not many people are aware there is an orange toned lip pencil out there so I wanted to show you there is. In general, MAC lip pencils are fabulous as they're soft, they don't drag, they're easy to apply and they have great staying power. You can also wear the lip pencils alone or underneath a lipstick, but I will warn you that if you have dry lips you may want to wear a gloss on top if you're wearing the lip pencils on their own as they can be quite drying. What many people don't know is that MAC have a wide selection of lip pencils available and this is probably due to them not being openly on display. The lip liners come in a wide selection of shades, from burgundy to pink to orange. When it comes to lip liners MAC really have got it covered, it's just a shame they're poorly displayed in-store because I'm sure a lot of people wouldn't know they existed. Aside from MAC being a great place to buy funky coloured lip liners, the 'Lasting Sensation' lip pencil is beautiful, it's a perfect orange lip pencil for wearing underneath orange toned lipsticks, and I have to admit that I even wear it underneath pinky orange lipsticks! Overall I love the MAC lip pencils and I especially love the colour of 'Lasting Sensation' lip pencil.

Yellow - Juicy Couture 'Viva La Juicy' Perfume
I didn't really know which product to use for my yellow product because I do have yellow eyeshadows and lipsticks but I only ever use them for creative purposes so I wanted to include a product I wear often.  In the end I had to opt for my Juicy Couture 'Viva La Juicy' perfume because this is something which I use often and in all fairness it is yellow, so I think I can get away with that one. It's a really lovely perfume, especially for the summer, and it really lasts on the skin. I tend to find some perfumes wear off after a couple of hours but this really doesn't, the scent remains until you wash it off. I'm no good at describing scents which is appalling as I'm a beauty blogger but all I can describe it as is girly (what an insightful description). It's a lovely perfume with a lovely scent and if you like the other Juicy Couture perfumes, you'll like this.

Green - Illamasqua Eyeshadow in 'Pivot'
I got this eyeshadow in the Illamasqua sale at Christmas and I didn't think I'd end up loving it as much as I do. The reason I bought 'Pivot' in the first place was because it was £5, it looked like a funky colour and I thought I could chuck it in my MUA kit if I didn't like it when it arrived. Anyway, 6 months has past and it's probably the best £5 I've ever spent, it's uber pigmented, super soft, lasts on the eyes and it has immense colour pay off. What you see in the pan is what you get on your eyelid, you literally have to use the smallest amount and you don't need to layer the eyeshadow at all. I've found in the past that some bright eyeshadows need layering but this baby certainly doesn't.
Also, some of you may be thinking that 'Pivot' is far too bright and that it's not a wearable eyeshadow but let me just tell you, 'Pivot' works well with a neutral smokey eye especially if you place a small amount of 'Pivot' in the inner corner of the eye, it really does make the eye 'pop' (really hate the word but it was necessary).
It's a beautiful eyeshadow and I have to say that it's the nicest green eyeshadow I own (and I have a few!). It's safe to say that this beauty didn't end up in my MUA kit.

Blue - Estee Lauder Daywear Sheer Tint Release
Not many people know what this product is so let me just explain a little bit about it. The Estee Lauder Daywear Sheer Tint Release is essentially a tinted moisturiser that when blended, it adapts to your natural skin tone. It's a perfect product for those people who like wearing light weight products that give a hint of colour. The sheer tint doesn't give any kind of coverage whatsoever so it wont cover any sort of imperfection but it does give the skin a lovely healthy and even glow. I love wearing the sheer tint in summer as I find foundation too heavy to wear in the summer months, it makes me feel as if my skin cant breathe so the sheer tint is a great alternative. I love sheer tint and I'll be buying another bottle when my current one is empty.

Indigo - Urban Decay Eyeliner in 'Ransom'
Again I cheated a little with my indigo product as the only indigo thing I could find was my Urban Decay eyeliner in 'Ransom'. You can always rely on Urban Decay for cool coloured eyeliners so I knew I'd have an indigo-ish eyeliner amongst my Urban Decay eyeliner collection. Urban Decay eyeliners are brilliant (hence why I own so many), they're really soft, pigmented, glide onto the eye with ease and they stay on the eyes all day. 'Ransom' is also a fabulous colour, it's navy blue with a hint of purple, it'd definitely be a nice alternative to black if you wanted to wear something a little different.

Violet - MAC Lipstick in 'Strong Woman'
I've never been fond of purple lipsticks as I didn't think they'd suit me but when MAC released the ever so beautiful 'Strong Woman' lipstick I took a chance and just bought it, it could have been the best thing since sliced bread or it could have been an utter disaster. Luckily for me it was a winner because I was delighted to find that I in-fact didn't look like a pleb, it actually looked okay. Since buying 'Strong Woman' I have worn it near enough everyday and have suddenly grown a love for purple lipsticks, I think a purple lipstick addiction may be progressing. Even my boyfriend says he likes it best when I wear my purple lipstick and he says that it's his favourite so it must be a winner. 'Strong Woman' is a matte lipstick and like all MAC matte lipsticks it has amazing staying power and colour pay off. I love 'Strong Woman' and I'm gutted I didn't buy a backup.

Pink - MAC Blush in 'Pink Swoon'
I love MAC blushes as I personally feel they're the best on the market, they're pigmented, long lasting,  have great staying power and come in a variety of different shades and finishes. One of my favourite MAC blushes is 'Pink Swoon', a lovely pink sheertone blush. 'Pink Swoon' can be worn sheer or built up to a more intense colour which is great as you don't have to worry about applying too much, you can start off sheer and build it up. 'Pink Swoon' is ideal for me as I have no colour to my skin, if I apply a little bit to my cheeks it warms up my face a little, making me look alive as opposed to dead. 

Multicoloured - Inglot Colour Play Lipstick Palette
I recently did a post about my Inglot Colour Play Lipstick Palette so if you'd like to see an in-depth review with a trillion photographs and swatches then please feel free to check out that post. I had to use this palette for my multicoloured product because it's so funky, I mean, just look at that beauty! I was going to use one of my Urban Decay palettes but decided against the idea as they're not as funky as this little gem. The colours play lipsticks can be used on the eyes and face as well as the lips which is pretty cool and they can be worn alone or mixed together to create different shades. I absolutely love these lipsticks because they super creamy which means they're ideal for my dry lips and they're also extremely pigmented with excellent staying power. I won't go into much detail about the palette as I've done a huge review on it but all you need to know is that it's an amazing palette. And there's no denying that it's multicoloured.

Swatches
Top (Left to Right): MAC 'Lady Danger', MAC 'Lasting Sensation',  
Illamasqua 'Pivot', Urban Decay 'Ransom', MAC 'Strong Woman'
Bottom: MAC 'Pink Swoon'

Video Version

I hope you liked this tag and if you decide to do it, let me know!

Much love,
Cole
x

Sunday 9 June 2013

INGLOT Colour Play Lipstick Palette: Review, Photos & Swatches


If you watched my London haul on YouTube, you'll know that I recently purchased the new Inglot colour play lipsticks and a 10 pan square palette. As you all know, I absolutely love wearing bright lipsticks and I love mixing lipsticks together to create my own unique shade so I when I saw this palette I knew I needed it in my life. 

The Inglot Colour Play lipsticks can be worn on the lips, eyes and face, and they can be worn alone or they can be mixed together to create unique shades. 
They are ideal for anyone who likes experimenting with makeup and they're also great for MUA's. I know for a fact that I'll be having one of these palettes in my kit as well as in my own makeup collection. 

Photos

This is what the freedom system 10 square pan looks like. It has a thick magnetic bottom and a strong magnetic lid, the palette itself is extremely sturdy and durable. The lipsticks slot into the palette and remain intact via the power of magnetism. Once the lipsticks are in the palette you won't be able to remove them with your hands. 


Top Row: 94, 93, 92, 91, 100
Bottom Row: 95, 99, 98, 96, 97

94 - Bright Blue 
93 - Teal
92 - Lime Green
91 - Yellow
100 - White
95 - Indigo
99 - Purple
98 - Hot Pink
96 - Bright Pink
97 - Orange 

Arm Swatches
Top Row: 94, 93, 92, 91, 100
Bottom Row: 95, 99, 98, 96, 97

Lip Swatches

Review

The Good
  • Concept - I think it's great how the lipsticks can be worn alone or mixed together to create a unique shades. I also think it's cool how you can use them on the eyes and face too.
  • Pigmentation - The lipsticks are EXTREMELY pigmented and I think the photographs prove this. All the lipsticks have intense colour and they have great colour pay off. You only need to use a small amount when applying the lipsticks meaning one lipstick will last you a while. 
  • Application - The lipsticks apply very well, they go on smoothly and they don't bleed whatsoever meaning you don't have to wear a lip liner underneath them. 
  • Longevity - The lipsticks last around 4-5 hours on the lips (this is through eating and drinking) which is standard for high quality lipsticks. If you were to wear shade 100 on its own you'd have to re-apply as it does go patchy. 
  • Texture - The lipsticks are incredibly creamy and soft meaning they're great for anyone who suffers with dry or cracked lips. They don't settle into fine lines or cracks and they don't irritate the lips at all. Another great thing about the lipsticks is that they haven't got a sticky texture.
  • Packaging - I think the palette is very well made and sturdy, it has a strong magnetised lid and a thick magnetised base meaning the lipsticks will not fall out of the palette. The lipsticks are in a metal pan meaning they stick to the base, once they're in the palette, they can't be removed, unless you use a magnet of course.
  • Price - The freedom system palette retails at £10 and the colour play lipsticks retail at £4.50 each, both of which are very reasonable prices. £4.50 is absolutely incredible for a lipstick, especially a high quality lipstick, you'd be hard pushed to find a decent drugstore lipstick for £4.50. If you purchased both the palette and all 10 lipsticks it would cost you £55, or £44 if you're an MUA, which is amazing!  

The Okay
  • Shade Selection - The shade selection is good but it could be better. I think it's good how Inglot have produced a good selection of bright and vibrant shades, and they've pretty much covered all the colours of the rainbow but where are the black and red shades? I really feel Inglot should have included all of the primary colours and not just 2 of them. If they included a red and a black, a lot more custom shades could be made. 
  • Opacity - Some of the lipsticks were more opaque than others, shades 93, 95, 99, 98, 96 and 97 were completely opaque whereas shades 94, 92, 91 and 100 were a little patchy. I think the lipsticks should all have the same opacity and I personally feel a little disappointed that some of the lipsticks were patchy. I didn't have to layer any of the opaque lipsticks but I had to layer the patchy lipsticks. 
  • Availability - Availability is an issue for me and this is due to the limited Inglot stores in the UK. The only way I can purchase Inglot products is online as the nearest Inglot store is more than 2 hours away. I rarely order Inglot products online because of two reasons, one, I like to swatch products beforehand and two, the delivery costs are absolutely ridiculous. Inglot really need to open more stores in the UK because their products are fabulous, and also cheap!

The Bad
  • Scent - It doesn't help that I'm quite sensitive to scents in the first place but when I say these stink, they really do. The scent reminds me of a mix between watermelon and sweeties, which some people may love but I personally hate it. Not only is the scent an issue for me but the fact the scent is overpowering makes matters a whole lot worse. When I swatched the lipsticks on my arm I noticed the scent straight away and if truth be told I dreaded doing the lip swatches.You'd think that the scent would wear off after a while but I'm sad to say it doesn't, you're left with sickly watermelon lips all day. If Inglot changed the scent, I'd be a happy bunny. 

Where to buy:


Rating

I absolutely love my Inglot colour play lipsticks and I'll definitely purchase them again in the near future. I really hope Inglot decide to bring out a black and a red lipstick as I feel this would make my colour play collection complete, I also love mixing lipsticks to create my own unique shades and feel I'd benefit from a black and a red lipstick. 

Below is a photograph of the aftermath of me swatching the lovely lipsticks. As you can see, I have a VERY stained arm. 


I hope you all liked this post and if you would like me to do a post on creative lip art and/or a post on mixing lipsticks please let me know. 

Many thanks for reading and I'll talk to you in my next post!

Much Love,
Cole
x

You May Also Like:

Related Posts Plugin for WordPress, Blogger...