Monday, 30 January 2012

Inglot Body Sparkles

I don't know if you know this but I have a rather large obsession with glitter. I possibly own at least one glitter from every makeup brand as I'm eager to try out different glitters. I know a lot of you are probably thinking 'isn't a glitter, a glitter?!' but trust me, all glitters are different in their own way. You could call me a glitter connoisseur. 

I know I probably don't need any more glitters but I really wanted to try Inglot glitters (Body Sparkles) as I'd heard they were meant to be fabulous. My boyfriend bought me an Inglot glitter for Christmas and loved it so much that I purchased 3 more. I'm so impressed with Inglot glitters and you shall find out why later in this post. 

Inglot glitters are formerly known as 'Body Sparkles' but to make life a lot easier, I'm going to refer to them as 'glitters' in this post. The Inglot glitters I'll be showing you are '59', '73', '66' and 'XL7' and they all retail at £12.00 each. 

So without further ado, here are the Body Sparkles I own...

'59'
Fine Multi-coloured Glitter

'73'
Chunky Silver Glitter

'66'
Fine Silver Glitter

'XL7'
Fine White Glitter (Blue Reflects)

Swatches...

From left to right; '59', '73', '66' and 'XL7'

From left to right; '59', '73', '66' and 'XL7'

The photographs above don't do any justice whatsoever so I decided to insert a mini clip to show you all how sparkly these beauties are. You'll be dazzled by the glitteriness!


The Good:
  • Pigmentation - All the glitters I purchased have amazing pigmentation. When using the glitters, you don't need to use much at all. The smallest amount is suffice. Whenever I use one of them, I just use what's on the inside of the lid. I also find that number '66' is the most pigmented due to the finer particles of glitter. 
  • Longevity - Inglot glitter lasts on the eyes all day. I find that with most glitter you have to apply a sticky base to the eyelids first as glitter tends to fall down or 'fly away'. You don't have to use a sticky base with Inglot glitter as it stays on the eyelids all day. The only way the glitter will come off is if you physically remove it yourself.
  • Texture - Inglot glitter has very fine particles which are lightweight. I sometimes find that glitter has large particles which can feel uncomfortable on the eyelids. This isn't the case with Inglot glitter, it's perfect for wearing in the daytime and the evening. 
  • Variety - Inglot glitters come in large selection of colours and they all have different particle sizes which is good if you're looking for a chunky or fine glitter. I love Inglot glitters and I think the colour selection is fabulous. 

The Okay:
  • Packaging - The glitter comes in a glass jar which might be considered to be a bad thing because if you drop it on a hard floor, it's going to smash. Other than that, I think the glass jar makes the product seem a little more expensive. More classy and of a higher quality. 
  • Size - The glitters aren't exactly the largest, they're quite small in comparison to other branded glitters. To give you an indication, MAC 3D glitters are triple the size of Inglot glitters and only cost £3.50 more. I guess the good thing with Inglot glitters is that you only need to use the tiniest amount unlike MAC glitters where you have to use a lot. 
  • Availability - Inglot have an online website and also a store in London but that's it. I wouldn't say you can easily get hold of Inglot products as there's only 2 ways of buying but for me, availability isn't a huge issue as I buy online. I just don't understand why they charge £5.00 for delivery.
  • Price - £12.00 seems quite reasonable for a glitter but I must admit, they aren't the biggest. If anything, the glitters are tiny in comparison to other branded glitters. 

The Bad:
  • Website - The glitters are amazing and I cannot fault them at all, but the website isn't the best. The glitter colour chart is appalling as it doesn't give you a clear image of what each glitter is like. The chart resembles a few fuzzy pictures so you basically have to guess what you think looks nice. Luckily I'm happy with my glitters but you really could get yourself in a pickle if you choose the wrong one by mistake. 

Overall I love Inglot glitters and I will definitely purchase more in the future. The quality of Inglot glitter is amazing and I think it's great how you only need to use the tiniest amount. The Inglot glitters I own are going to last me a lifetime but that won't stop me buying more. Out of all my branded glitters, I'd say Inglot glitters are the best, without a shadow of a doubt. If you can justify spending £12.00 on a glitter, definitely try Inglot. If not, then give POP glitters a go. 

Out of all four glitters, I recommend trying '66' and '73'. Those ones are the best by far!

I hope you like my lovely glitters and if you'd like to take a look at the other glitters available, here is the link; Inglot

Thanks for reading!
:)

Friday, 27 January 2012

Inglot Cream Lipstick in '127'

I have been wanting to try Inglot products for a while and as soon as they launched a UK website, I jumped at the chance of buying some of the products. I bought a large selection of eyeshadows, lipsticks, glitters, eyeliners and other various things of which I'll be blogging about in the coming weeks.

The first thing I'm going to show you all is a cream lipstick. I only purchased one of the cream lipsticks as I'd never tried them before but I think I'll be purchasing more very soon so hopefully I'll be able to show you more of the cream lipsticks in the near future.

Inglot offer 3 different types of lipsticks; 'Matte', 'Cream' and 'Pearl'. The different finishes are available in a wide selection of shades, possibly the largest amount of shades I've ever seen. The great thing about this is that if you're after a red lipstick but don't want a red matte lipstick, you can easily select a red cream lipstick. The lipsticks also retail at £10.00 each which I think is pretty reasonable as the quality is better than a MAC lipstick.

I knew I wanted to try a bright red lipstick so I tried to find a colour that looked remotely bright. Luckily I chose the right one, even though I had to guess.

So without further ado, here is the lipstick I chose...


Cream Lipstick in '127' 

Swatch on my hand...


Swatch on the lips...


The Good:
  • Pigmentation - The lipstick is very pigmented, I was actually shocked at how pigmented it was. You also only need to use a tiny bit, this is a huge positive as the lipstick is going to last. 
  • Longevity - The lipstick has great staying power, I would say it lasts around 6-8 hours with eating and drinking. With any other lipstick you would expect the staying power to be around 4-5 hours. 
  • Texture - The lipstick feels very comfortable on the lips so it would be a great choice if you suffer with dry lips. I find that I can't wear matte red lipsticks in winter as my lips go really dry so it's nice to have a red lipstick that I can actually wear. The lipstick applies very well to the lips as the texture is smooth and creamy. 
  • Size - The lipstick contains 4.5g of product which is brilliant. A MAC lipstick, for example, contains 3g of product so you're getting an extra 1.5g with Inglot lipsticks. More product for less of a price! 
  • Variety - I have honestly never seen as many lipstick shades in all my life, there is literally a shade for everyone. There's every shade imaginable, even a gold lipstick! 

The Okay:
  • Packaging - I wouldn't say the packaging was particularly good or bad, it's just okay. I think the black shiny tube is lovely, and in a way it looks quite classy but I think it could be better. I know I shouldn't be complaining about the packaging because the product itself is great but for £10.00, I think the packaging could be a little better. I also find that the lid is a little tricky to push on, almost as if you can feel air being trapped under the lid. It doesn't affect the lipstick in anyway but it just feels a bit odd when putting the lid back on. 
  • Availability - Now I know that Inglot have an online website and also a store in London but other than that you cannot get hold of it. I wouldn't necessarily say the availability is a huge issue as you can buy online, however I think £5.00 for delivery is appalling. 
  • Price - Although £10.00 seems quite reasonable, it's still considered to be expensive to some people. If you're looking for a cheaper alternative then try the Sleek 'True Colour' lipsticks! If you don't mind paying extra, then I'd definitely recommend trying an Inglot cream lipstick. 

The Bad:
  • Website - There is nothing wrong with the lipstick itself, but the website is horrendous. It's hard trying to find the perfect shade as the colour chart isn't very clear. I think Inglot need to take tips off Illasmasqua and start doing proper swatches as it's hard to look at various shades. I also think the website could be set out a little nicer as it looks a bit boring. 


Overall it's a lovely lipstick and I would recommend it to anyone. The only thing I will say is that it's quite bright so if you're a little colour shy, it might not be the one for you, you could always try another shade though! I'll definitely be buying more of these very soon!

If you'd like to check out the Inglot website then here is the link; Inglot

Thanks for reading!
:)

Wednesday, 25 January 2012

NOTD: Sparkles & Hearts

I know there's still a couple of weeks until Valentines Day but I felt like creating Valentines inspired nails, a little earlier than I planned to. I've basically opted for the typical valentines colours and of course, hearts. 

Nail varnishes used: Orly 'White Out', O.P.I 'Red My Fortune Cookie and O.P.I 'Shorts Story'.

I don't know whether to do a tutorial so if you'd like me to do one, comment below! 
:)

Saturday, 21 January 2012

Quick & Easy Neutral Look

Ever been in the situation where you've got less than half an hour to get ready? Have you ever woke up at the crack of dawn and felt like you couldn't be bothered applying an ounce of makeup? If you answered yes to both of these questions, then this post is going to be useful.

I've had past experiences where I haven't been able to apply makeup in the morning and if truth be told, it annoyed me. I love wearing makeup but when you have to wake up early, you just don't feel like applying it. I have recently been using some products which take little time to apply but still look lovely. 

I've decided to do a quick and easy neutral look as I feel people prefer to wear neutral colours. If you'd like me to do a quick and easy look using other colours then please feel free to ask me. 

Here's the quick and easy neutral look...


Products used to create this look:
  • MAC Paint Pot in 'Vintage Selection
  • Urban Decay Naked 2 Palette (Eyeshadows used; 'Suspect', 'Pistol' and 'Booty Call')
  • Urban Decay Glide On 24/7 Eye Pencil in 'Bourbon'
  • MAC Penultimate Eyeliner
  • Bourjois Fast & Perfect Mascara
If you would like to create this look then all you have to do is follow my nice and easy steps. 

1.) Apply Vintage Selection to your eyelids. I find patting it on with a flat eyeshadow brush works best. 
If you want a really opaque colour on your eyelid, apply one layer then let it dry. Once dry, apply a second layer.

2.) Apply ‘Suspect’ to the outer corner and blend using a blending brush. A simple way to blend is in ‘v motions’. Blend into the centre and also into the crease. 

  
3.) If you’d like more of a smokey look, apply a small amount of ‘Pistol’ to the outer corner. It is key you don’t over blend ‘Pistol’; just literally place it in the inner corner using circular motions.

4.) For the highlight, apply ‘Booty Call’ to the brow bone. 

5.) Using ‘Bourbon’, line your bottom lash line. 

6.) Apply the MAC eyeliner to your top lash line, I didn’t create a winged effect as I wanted to keep the look quite neutral but you can do winged eyeliner if you’d like to. 

7.) Apply mascara to both your bottom and top eyelashes.

If you'd prefer to watch the video version, here it is...


I hope you liked this look and if you have any questions please feel free to ask. I'm also planning on doing a Q&A so please ask me any questions!


Thanks for reading!
:)

Wednesday, 18 January 2012

How to create Zooey Deschanel Tuxedo Nails!

Zooey Deschanel was recently spotted wearing funky tuxedo nails at the Golden Globe Awards earlier this week. They have probably been the most talked about topic this week as everyone is going crazy for her nails. Various magazines have commented on how much they love them and I know a few of my followers love them too. Since they're a simple yet fun design, I thought I'd show you all how to create them. 

What you will need to create tuxedo nails:
  • White nail varnish
  • Black nail varnish
  • Dotting tools
If you don't own dotting tools, cocktail sticks are a great alternative! You can basically use anything with a point. 

If you want to create these lovely nails all you have to do is follow my nice and easy steps.

1.) Apply white nail varnish to your nails. You may need 2-3 coats as white nail varnish tends to have a thin consistency. 


2.) Apply the black nail varnish to the tips of your finger nails (a bit like a french manicure).


3.) For the bows you will need to use a medium sized dotting tool and the black nail varnish. The trick is to create two triangular shapes.
For the buttons you will need to use a small dotting tool and the black nail varnish. Simply dot three dots.


And we're done!


I personally think these nails look really cute! If any of you decide to give them a go, feel free to send me a picture on Twitter as I'd love to see!

If you have any nail tutorial requests or questions, please comment below or get in touch!

Thanks for reading!
:)

Tuesday, 17 January 2012

MAC Shop, Shop, Shop / Cook, Cook, Cook Collection

It doesn't take a genius to work out what this post is going to be about as the title is a little bit of a giveaway. MAC are launching a lot of fabulous collections this year and judging from what I've seen of this collection, it's going to be a beauty! The collection will contain a lot of vibrant colours and it seems like the collection contains a few re-promotes so if you've missed out on something before, now's your chance to buy! The collection will be released in the US at some point in February and Internationally at the beginning of March.

I cannot say much about this collection and obviously cannot provide swatches as I don't own any of the products but I thought I'd show you some images.


Once I know more about this collection, I will do an update! I'm so excited about this collection, it's unreal!

Thanks for reading!

Friday, 13 January 2012

Urban Decay Naked 2 Palette

I know it sounds quite sad but I have actually been so excited for the launch of this palette and when Debenhams said they were launching early I was even more super excited. I also managed to bag my Naked 2 even before the 12pm launch, thanks to Sinead ;) Oh what an entertaining night that was! All I can say is, power to the bloggers!

The Naked 2 palette contains 12 beautiful eyeshadows, 5 of which are brand new shades! It also comes with a travel sized Lip Junkie Lip Gloss (3.7ml) and a double ended eyeshadow brush. Each eyeshadow contains 1.3g of product which is great as most eyeshadows contain around 1.5g. The palette retails at £36.00 which does seems quite expensive but if you look at it logically, you are getting 12 eyeshadows, a brush and a lipgloss, you could even count the huge mirror as an extra. I love how the palette comes with a big mirror, it's a practical palette for carrying in your handbag as you've got everything you need to create an everyday look. If you were to buy 12 MAC eyeshadows and one MAC shadow brush it'd cost in the region of £134.00 so you're saving yourself a fortune by buying the Naked 2 palette. The palette also comes in a tin which is great for storage purposes as you don't have to fear that your palette is going to get crushed. The tin packaging also makes the palette a little more sturdy when opening it. 

The palette contains a lovely mix of eyeshadows, including warm and cool toned eyeshadows. You can create so many looks using this palette, I literally use the Naked 1 palette in all of my tutorials. I cannot wait to use this palette in future tutorials. 


The Naked 2 Palette


Inside


Close up

From left to right: Foxy, Half Baked, Booty Call, Chopper, Tease, Snake Bite.

From left to right: Suspect, Pistol, Verve, YDK, Busted, Blackout.


Swatches

Top Row (from left to right): Foxy, Half Baked, Booty Call, Chopper, Tease, Snake Bite.
Bottom Row (from left to right): Suspect, Pistol, Verve, YDK, Busted, Blackout.

Lip Junkie Lip Gloss


Double ended brush

Shadow Brush

Crease Brush

Overall I love this palette, it's got a lovely mix of eyeshadows and I will definitely use all of them. I cannot say that I dislike any of the eyeshadows, even though some of them are slightly orange toned. If I had to pick my favourite eyeshadows out of the palette, I'd have to say that I prefer all of the eyeshadows on the right side as they're more silver toned and those kind of eyeshadows suit me best.

I think it's great how the palette comes with a double ended brush because you could literally just use that brush to create a look. You don't have to faff around finding another brush to blend or pack on the eyeshadow. The brush is practical and I like it, no mess, no fuss.

I also like the lip gloss too which surprises me because I usually cannot bear wearing lipgloss, the whole hair sticking to your lips scenario does my head in. The lipgloss tastes and smells like after eights which is also another bonus for me, it's like Lush Mint Julips but in lip gloss form. The colour of the lip gloss is really pretty, it's a nude gloss with pink pearl. Great for applying over nude or pink lipstick. 


I'm going to be doing a comparison post between the Naked palette and the Naked 2 palette. A lot of people are put off buying the Naked 2 as they think it looks similar to the Naked palette but trust me, there is a difference. And you'll see in my comparison post!

I love this palette, do you? 
Thanks for reading!
:)

Monday, 9 January 2012

Zalando Purchases!

A couple of months ago, a lovely lady named Amy from Zalando contacted me to ask me if I would like to feature Zalando on my blog. I agreed as I wanted to help people become more aware of the company as I feel it's important to share new online shops to my lovely readers. In return of doing this, Amy kindly sent me a £25 voucher to spend on the website.

If you don't know much about Zalando then it's basically an online shop. It sells a whole variety of items including; shoes, clothes, accessories and most importantly, makeup! Branded items like Ugg, Miss Sixty and Converse can be bought from Zalando and the best thing is that they're sold at discounted prices! I personally didn't need any clothes or shoes at the time so treated myself to 2 lipsticks using the voucher that Amy had sent me. 

The good thing about Zalando is that they're constantly doing amazing discounts which is great for all of you! And I also have to say that delivery is super speedy, I literally received the lipsticks after 2 days of ordering them! If you haven't checked out Zalando then it might be worth doing as you could find yourself a gem. Here is a link to the Zalando website; Zalando

So now you know a bit about Zalando, I'm going to talk to you about the lipsticks I purchased. The lipsticks were not created by Zalando, they were created by Lipstick Library. I'd never heard of Lipstick Library before but I thought I'd try out a couple of their lipsticks as there was a wide selection to choose from and they were only £10.00 each, much cheaper than a MAC lipstick! I didn't know what to expect from the lipsticks as I'd never tried them but I was hoping they'd be great. Zalando sell a lot of well known makeup brands, including Burts Bees and Korres, these brands are great so I thought the same would have applied to Lipstick Library. 

Here are the lipsticks I purchased...

From left to right; Classic Red, Playful.

The lipstick tubes are rather large considering there is actually little product in the tube. I just don't understand why the tube is so big, it's a waste of plastic. I also think the lipstick tube looks cheap, I don't understand the transparent band around the centre of it and the horizontal writing looks a little boring. A bigger and better font should have been selected as the brand name doesn't really catch your eye. The only noticeable thing about the writing is that it looks wonky. These lipsticks really don't look as if they cost in the region of £10.00. 


Playful is basically your average brown toned nude lipstick. It looked very different on the Zalando website, more of a pink toned nude so I was a little disappointed when this arrived as it looked nothing like it did online. I always opt for pink toned nudes because I know they suit me but brown toned nudes look horrendous on me as I'm ridiculously pale. I really thought this lipstick would have been the colour I had seen on the website but evidently not. I think it was primarily down to the photographs looking quite computerised, in hind sight, I should have looked up swatches or something. 


Classic Red is just a typical classic red lipstick. It's a perfect red that will suit anyone, whether you have a pale or dark skin tone. The lipstick itself has brilliant pigmentation and I would recommend buying it if you're the sort of person that's on the go 24/7 and needs a lipstick that will last all day. There's not much I can say about this lipstick other than it's a lovely red and I'd consider it to be of high quality. It reminds me of Chanel Dragon so I guess you could call it a dupe for that. 


There's no denying that both of these lipsticks are highly pigmented, in fact so pigmented, the red lipstick stained my hand after doing a swatch. Playful lasts around 3-4 hours without fading which is standard as I have some high end lipsticks last around 3-4 hours too, but Classic Red lasts around 7-8 hours which is amazing. I guess it shows that a higher price tag doesn't necessarily mean better quality.

Overall I'm happy with the lipsticks, apart from the colour of Playful but it won't stop me from using it. I'm also very impressed with the Zalando customer service as it was a smooth, fast process. I would definitely purchase from the Zalando website again and I highly recommend that you go and check out the website. 

Thanks for reading!
:)

Friday, 6 January 2012

Katy Perry 'Change Begins Within Celebration' Look

This look was requested a couple of days ago so thought I'd give it a go. It's basically a lovely copper bronze look with strong brows. It's a perfect for any season of the year, especially spring/summer! Katy Perry pulled off this look brilliantly and it complimented her lovely pink and blonde bob very well! 

Here is the look Katy Perry wore...


And here is the look I created... 


Products used to create this look:

  • Urban Decay Eyeshadow Primer Potion
  • Urban Decay Glide On 24/7 Eye Pencil in 'Bourbon' 
  • Sleek Original Palette
  • MAC Zoom Lash Mascara
Here are the eyeshadows I used from the Sleek Original Palette. I have circled the eyeshadows I used as the eyeshadows in this palette aren't named.


For reference, I'm going to refer to the eyeshadows as gold, copper, and bronze. 

If you would like to create this look then all you have to do is follow my nice and easy steps. 
  1. Apply Urban Decay Eyeshadow Primer Potion to your eyelids. Blend using either a brush or your finger. 
  2. Apply the copper eyeshadow to your eyelids using a flat eyeshadow brush. Patting the eyeshadow on works best for me as I find that it prevents fall-out. Once you've applied the eyeshadow to your eyelids, blend out using a fluffy brush. 
  3. Once the base eyeshadow has been blended, apply a small amount of the bronze eyeshadow into the crease and blend again.
  4. Taking a large brush, apply the gold eyeshadow to your brow bone. You'll also need to apply the gold eyeshadow to the inner corner of your eye, I used a small eyeliner brush to do this as it's more precise. 
  5. Apply the copper eyeshadow to your bottom lash line, you can do this by using any small flat brush. You'll also need to apply the gold eyeshadow on the inner corner of the bottom lash line. 
  6. Using a brown eye liner, line your top lash line and both your top and bottom waterline. 
  7. Apply mascara to both your bottom and top eyelashes. You could also apply false eyelashes at this point but it's completely optional. 
It sounds quite tricky to do but trust me, it isn't! You also don't need to use the exact products that I used, you can use whatever you want. If you want to know some good alternatives then check out MAC 'Woodwinked' and 'Antiqued' as they are practically the same as the eyeshadows I used. 

I hope you liked this look and if you have any makeup requests then let me know! 
Thanks for reading!
:)

Tuesday, 3 January 2012

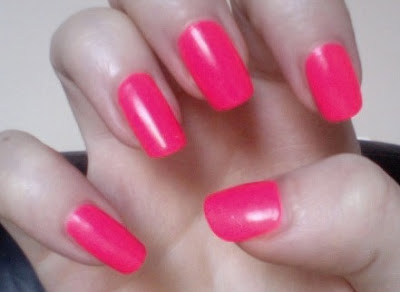
NOTD: Nubar 'Hot Pink'

I have never tried Nubar nail varnishes before and since they were on offer on Beauty Bay I thought I'd try a couple of the shades. I purchased 'Hot Pink' and 'Amazon Coral'.

'Hot Pink' has to be my favourite out of the two so I thought I'd try that one out first. It's basically a bright neon pink, in some ways it resembles Orly 'Passion Fruit' except it's got pinker undertones to it.


It's a lovely summery colour and it's definitely not for the colour shy. I tried to take a photograph on my iPhone and camera but neither would show it's true colour so I had to rely on my trusty Mac. Even though the nail varnish looks very bright on this photograph, it's a lot more neon in real life. It's a beautiful colour and if you like Models Own 'Bubblegum', you're going to LOVE this.


Thanks for reading! If you have any questions about the nail varnish, please feel free to comment below!
:)

Monday, 2 January 2012

Best Beauty Products of 2011


I’m not going to lie, this post is a little hefty and it’ll probably take around 12 hours to read so I suggest getting a drink before you sit down and read it. I’m not going to explain what this post is going to be about as the title is pretty self-explanatory so without further ado, here are the products I loved throughout 2011.


Chanel Illusion D’Ombre in ‘Epatant’ - £22.50
This has probably been a favourite of mine ever since I purchased it. It’s a beautiful colour, has a lovely fluffy texture and it’s so quick and easy to apply. The best thing about this cream eyeshadow is that it lasts all day without creasing or fading, great for if you’re a busy bee like myself and need something that it going to last throughout the day. You can also apply different eyeshadows over the top of the cream shadow and it’s also really blendable. A must have for any make-up artist or make-up lover!


Collection 2000 Lasting Perfection Concealer in ’01 – Fair’ - £4.19
This is the best concealer of life and it’s only £4.19! I have an Estee Lauder concealer very similar to the Collection 2000 concealer, the only difference between them is that the Estee Lauder concealer is £19.50 and it’s also too dark for me even though I bought the palest shade… handy. You could buy 4 Collection 2000 concealers for the price of one Estee Lauder concealer.
I adore this concealer; it’s creamy, long lasting and most of all blendable. You usually find that full coverage concealers are a pain to blend as they tend to be quite thick but you don’t experience this with the Collection 2000 concealer. You can blend with a brush but I use my finger as I think this works best. I also love how this concealer covers anything; it covers spots, scars, and skin pigmentation, basically anything that needs covering! I bet it would even cover tattoos!
I highly recommend this concealer and if you haven’t tried, you need too! It’s AMAZING. The only downfall is that it’s only available in 4 shades so if you have a dark skin tone, you may not find a suitable shade. If this is the case then I would recommend mixing a bit of foundation into the concealer to darken the shade.


Illamasqua Skin Base Foundation in ‘06’ - £25.00
I have to admit that I absolutely love foundation, without it I’d have a mini meltdown. It covers a multitude of sins and gives the impression a have ‘Beyonce like’ skin. (I envy her skin so much!) I own so many different foundations but my Illamasqua Skin Base is the foundation I reach for the most. It has such a lovely lightweight consistency meaning it doesn’t feel heavy on your skin. It also covers everything, which is great considering the foundation is so lightweight. The foundation is available in so many shades so there is a shade for absolutely anyone. This foundation beats any foundation that I’ve ever tried and if you haven’t tried it, go and get yourself a sample! You will not be disappointed.


MAC Eyeshadow in ‘Short Shorts’ - £11.50
This eyeshadow was part of the MAC Surf Baby collection, a collection that contained a vast amount of bright, beautiful colours. A collection I had high expectations for. At first I was a little disheartened by the eyeshadow as it doesn’t have great pigmentation, it’s quite sheer and does need building up if it was to be worn on it’s own. I was instantly put off by its sheerness but was willing to try different methods of application. I found that this eyeshadow is a perfect highlight eyeshadow because it’s not too shimmery, it’s just gives a nice glow. I literally use it everyday now and have become best friends with it. So here’s a handy tip, if a product isn’t working for you, make it work by giving it a different use.


MAC Penultimate Eyeliner - £14.00
I have to admit, I’d had my ups and downs with this product, not because it’s rubbish but because it sometimes makes my eyes run a little bit. I’ve learnt not to use it anywhere near my waterline otherwise problems will occur. Overall it’s a brilliant eyeliner, it has a nice tip and it gives such a precise line. The good thing with this eyeliner is that it’s a true black and it lasts all day. It also lasts for months on end, to give you all an indication, I bought this eyeliner around spring time and it’s still going strong, 9 months isn’t too bad don’t you think?!


MAC Zoom Fast Lash Mascara - £13.50
I own many types of mascara not because I’m a crazy mascara addict but because I cannot simply find a good mascara that will lengthen, separate and add volume to my eyelashes. I don’t know if many of you know this but my right eyelashes are twice as long as my left eyelashes, a little weird but also a nightmare. I would invest in individual lashes but after hearing they rip out natural eyelashes, I was soon put off the idea, I’ll just stick to mascara. The point I’m getting at is that this mascara is by far the best mascara that I’ve ever tried; it actually makes my left eyelashes look remotely normal which is a massive bonus for me! The mascara also does a great job of lengthening and separating my lashes, its just genius. It’s a great mascara for wearing everyday even though it gives you huge eyelashes! I just LOVE the stuff and I will DEFINITELY re-purchase!


MAC Shadestick in ‘Tundra’ - £13.50
I bought this around mid September, I didn’t know much about shadesticks so I thought I’d try one, I also loved the colour and I think this was another factor why I bought it. If you don’t know what a shadestick is, it’s basically a pen style eyeshadow; they’re fast and easy to apply. The great thing with shadesticks is that they can be worn alone or you can blend other eyeshadows over the top of them. I also use my shadestick as an eyeliner too. They are practical for those people who have little time to apply makeup in the morning. Just swipe over your eyelids, blend a little using a fluffy brush and you’re done!


MAC Lipstick in ‘Unknown Pleasures’ - £13.50
I recently got this lipstick and I have to say that it’s probably the best berry toned lipstick that I’ve ever tried. It’s a mattene lipstick, which is basically a matte lipstick without the horrible dry feeling. I’m quite saddened that MAC haven’t made these lipsticks permanent because they truly are brilliant, the formulation is amazing. I love everything about these lipsticks, the packaging is sleek, they glide on the lips with ease and they last 8+ hours without fading! The perfect lipstick for wearing to a meal as drinking and eating does not affect this lipstick in anyway. A good tip if you buy one of these lipsticks, use eye makeup remover to remove it because it you don’t, this baby will not come off!


MAC Lipstick in ‘Mlle’ - £13.50
This is the perfect nude lipstick and even though it’s a glaze lipstick, it has great pigmentation and lasts around 5 hours without fading. I primarily wear this lipstick when I wear a bright or smokey eye, as I want all the focus to be on my eyes and not my mouth. It’s also my go to lipstick when I don’t know what lipstick to wear. Some people dislike this lipstick, as it is quite pale and can resemble ‘foundation lips’ but because I’m ghostly pale, I can pull it off. I going to be devastated when I run out of this beauty, I just hope MAC re-promote this lipstick in a future collection.


Nars Lipstick in ‘Schiap’ - £17.50
This was one of the very first lipsticks I purchased in 2011 and it remained one of my favourites, especially one of my favourite pink lipsticks. This lipstick is so pigmented that it actually stained my hand after swatching it, it is definitely a lipstick that you can rely on.  This lipstick lasts around 12+ hours; you literally need to scrub it off your lips so invest in a decent eye makeup remover! The only warning I will give you is that you need to apply it with a brush, if you apply it directly from the tube and get a bit on your skin, then you’re going to look as if you’ve been chomping on beetroot.


Nars Loose Powder in ‘Flesh’ - £26.50
2011 was the year I discovered loose powder. It wasn’t that I’d never heard of them before, I just didn’t feel the need to own one. After a couple of months of blogging I noticed that a lot of people were raving about certain loose powders so I decided to check them out. After deliberating between Chanel translucent powder and Nars loose powder, I went ahead and bought myself the Nars loose powder. It’s a hefty tub and I don’t think I’ll ever reach the bottom of it; I’ve had it for months and haven’t even used a quarter of it. I use the powder to set my makeup and I also use it on it’s own when I don’t want to wear foundation. The powder has a slight tint to it so you’re able to wear it alone or on top of other products. It’s a great powder and it does exactly what it says on the tin. It doesn’t cause breakouts, it’s not cakey what so ever and it feels really light on the skin. It really is flawless skin in a tub.


No7 Cleanse & Care Eye Makeup Remover - £7.75
Skincare is very important to me and if I didn’t follow a skincare routine I know I’d develop under the skin spots and other little demons. One product I think ever makeup wearer should own is a good eye makeup remover as it’s important to remove every last bit of eye makeup. I used to use the Clarins eye makeup remover but after learning that it didn’t last long (approx. 2 weeks), I figured I needed to seek a different eye makeup remover. After seeing online reviews, I opted for the No7 eye makeup remover. It’s a brilliant product, it removes waterproof makeup and one bottle lasts around 2 and a half months, which is brilliant! Another thing I like about this product is that it comes with a pump meaning you don’t use up a lot of product, the remover can also be mixed with water too. It’s a great makeup remover and I highly recommend it to anyone.


Orly Nail Varnish in ‘Passion Fruit’ - £6.95
This is a beautiful yet unique colour. It’s basically a mix of red, pink and orange, a true passion fruit colour! Orly nail varnishes are amazing, they have great staying power and each bottle contains 18ml, which is brilliant as the majority of nail varnishes contain 8-15ml. I’m quite shocked at how reasonable Orly nail varnishes are because I would have expected them to cost a lot more as the quality is exceptional. Orly has a great selection of nail varnishes available, from bright neons to subtle shimmers.


Sally Hansen Double Duty Top Coat - £4.95
I use this top coat over absolutely anything, whether it being a plain colour or fancy nail art.  It really does help to keep your nail varnish in place. I also have an O.P.I top coat that was triple the price of the Sally Hansen top coat and in comparison it’s rubbish, I actually regret buying the O.P.I top coat. The Sally Hansen top coat is by far the best top coat that I’ve ever tried and once I’ve run out of it, I will be re-purchasing.


Sleek Oh So Special Palette - £6.49
This is a lovely little palette, it contains a great mix of colours and it’s an ideal palette for creating various different smokey looks. From brown smokey to purple smokey. The pigmentation of the eyeshadows is amazing; they are so pigmented that you literally need to use the tiniest amount. If you would like to see swatches and an in depth reviews, check out this blog post: Sleek Oh So Special
I honestly cannot praise this palette enough! For £6.59, it’s amazing!


Urban Decay Naked Palette - £35.00
I have seen this featured on a lot of people’s ‘products of 2011’ posts so I won’t say much about it as I think my opinions will relatively be the same. All I have to say about this palette is that it contains 12 beautiful colours and the perfect palette for creating everyday and smokey looks. The eyeshadows are also extremely pigmented and blend so well! I just cannot wait to get my hand on the Naked 2!
I also have a full post on the palette so if you would like to see swatches and an in depth review then it may be a good idea looking at that post if you wish to know more information about it. Here is the post: Urban Decay Naked Palette


Here are the swatches...

Top Row: Epatant, Short Shorts, Tundra, Eyeliner, Flesh.
Bottom Row: Mlle, Unknown Pleasure, Schiap, 01 Fair, 06.


 If you would like to see the video version of this post, here it is:


I hope you all enjoyed looking at my best beauty products of 2011! If you have any questions, please comment below! 

Thanks for reading/watching!
:) 

You May Also Like:

Related Posts Plugin for WordPress, Blogger...